Users with a district admin credential have the ability to create Customized Content and share it across the district. Along with the current Customized Content features available for teachers, district admins have the ability to leave separate instructions for students and teachers.
From your Studies Weekly Online account, select District Customized Content from the District Admin tab in the primary navigation bar at the top of the screen.
Every piece of District Customized Content will appear on the Customized Content list and be visible for all district admins. The District Customized Content will not appear for teachers until it is shared with them by a district admin. It will not appear for students until it is assigned by their teacher.
From the District Customized Content page, select the Create Customized Content button in the upper right corner.
Use the following image and instructions to create content for the district.
Step 1 of 2: Details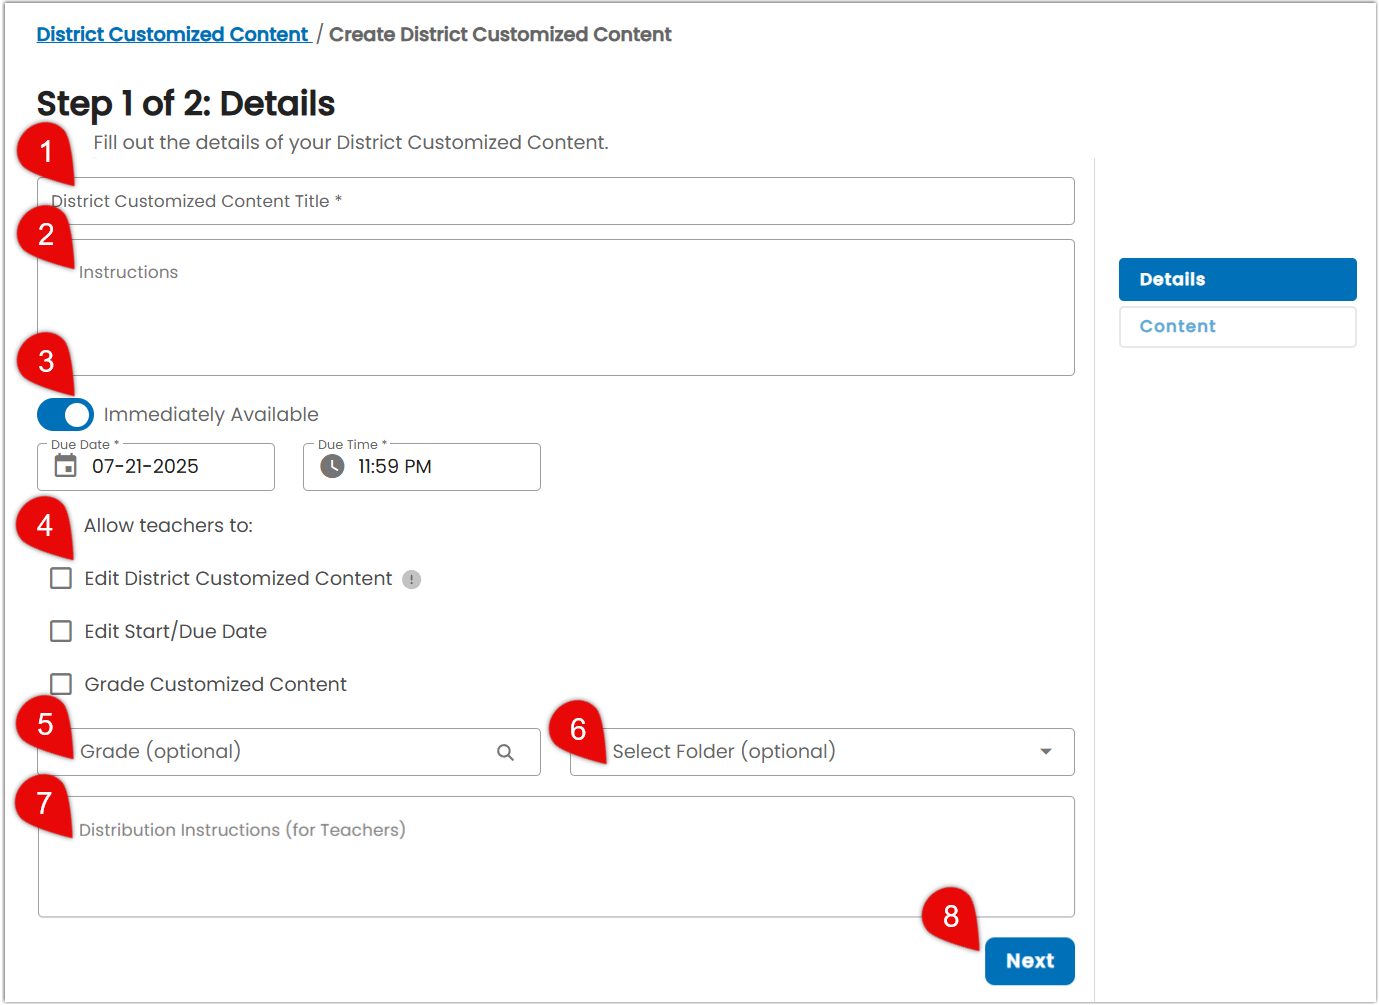
- Choose a Title that will be visible to students.
- Add Instructions students will be able to follow.
-
If you wish to set a future Start Date, turn off the Immediately Available toggle. Then choose your dates and times.
- The default Due Date is one week from the Start Date.
- The optional Start Time and Due Time will default to 12:00 AM and 11:59 PM when the Immediately Available toggle is disabled.
- Choose whether to allow teachers to:
- Edit the District Customized Content (title and instructions only).
- Edit the Start/Due dates.
- Grade the Customized Content. This box will be required for certain questions types that require teacher grading.
- Choose a Grade level for the content. whether allow teachers to:
- Select a Folder to organize the content so it is easier to find.
- Add Distribution Instructions for teachers.
- Click Next in the bottom right corner to move on to Step 2 adding content.
Select the +Add button to insert your own Question, Item, choose from Add Previously Created Customized Content questions, Studies Weekly created Digital Printables, or the Question Bank. For a deeper dive into the question types visit the Understanding Question Types article.
If you would like to add Open Response question types, consider who will grade the responses. If the box remains unchecked for teachers to grade District Customized Content, those question types will be disabled.
- Once you make your selection, fill in all the fields for the question type and select Save. (Questions are added one at a time.)
- To add additional questions or items, click the +Add button..
- Click Create to save. This does not share the content with teachers or students.
Sample Multiple Choice question:
District admins are encouraged to create Folders to house the Customized Content items they create. Folders can be created before, during, or after creating Customized Content. Creators can also have a Folder within a Folder.
Studies Weekly recommends titling your Folder(s) for specific content areas, schools, or for the author of the content. After naming your Folder(s) and assigning a color, click Create.
Folders can be edited or removed later by using the 3 dots menu next to the name of the Folder. Only empty Folders can be Removed.
Customized Content items not assigned to a Folder will be shown under the Customized Content list.
As the school year goes on district admins may need to use the search bar or filter options to locate specific items.
District Customized Content can be shared individually with teachers or with all teachers assigned to selected schools containing a specific activated publication.
Note
Teachers will receive an email and a notification (in their Studies Weekly Online Account Dashboard) that a district admin has shared District Customized Content with them. The content will then need to be assigned to their classes. Visit the How Teachers Assign District Customized Content article to learn more.
To share District Customized Content, navigate to the Customized Content page and click the Share button in the bottom right corner of the piece of content.
A pop-up modal will appear containing the sharing options. Once the content has been shared, the questions cannot be modified.
Success
If a district admin attempts to edit the already shared Customized Content, a pop-up modal will appear, Click OK and a new copy will be created.
The original can be hidden by the district admin using the Visibility Toggle. Read more about the Visibility Toggle in the Edit tab of this article.
Use the following image and correlating options below to share District Customized Content.
- Copy the shareable link and send it to any users in the district via email or other digital communication. If this option is chosen, the recipients must select which class(es) will be assigned the District Customized Content.
- Choose a publication to filter out extra schools or classes. Publications can be filtered by grade level to narrow down the list.
- Select which schools will receive the content. When schools are selected, teachers in those schools are automatically selected in the next step and then can be filtered.
- Choose which teachers will receive the content. If this option is chosen, the recipients must then select one or more of their classes to receive the content before it is visible to students. As the content is assigned by teachers, the number in the Assigned bubble will change.
When finished with your selections, click Save for the District Customized Content to be shared or Cancel to start over. After clicking Save, a notification will appear at the top of the screen confirming that sharing was successful.
Recommendation
District admins can see which classrooms teachers have assigned the District Customized Content to by selecting Assigned in the three dots menu.
There are two options for editing District Customized Content. Please review each option before sharing what you've created with teachers.
Content can be removed from the Customized Content list as long as it has not been shared with any teachers.
If content has not been shared yet, you can edit everything within the District Customized Content. Navigate to the District Customized Content you want to edit and click the title or find the Edit button in the three dots menu as shown above.
The District Customized Content will appear on screen. Make the necessary edits (including adding more questions) then select Save in the bottom right corner.
The content is now ready to be shared.
If District Customized Content has already been shared with teachers, the only things that can be edited are the Title, Dates, and Times. If you try to remove or add questions, or change point values, a pop-up modal appears stating that the content can no longer be modified.
However, you do have the option to create a new copy and share the edited version by clicking OK on the pop-up modal. Then follow the steps above as if you were creating new content.
If you do not want to create a new copy, click the X.
Once the new version of District Customized Content is created, you will want to make the original copy hidden to teachers and students by toggling the Visibility Toggle off (from blue to gray) to prevent confusion.
If the Visibility Toggle is changed to gray, this will remove it from teacher’s Customized Content list and the student’s To Do list. The box around the piece of content will also appear grayed out on the district admin’s Customized Content list as shown.
The new copy is now ready to be shared with teachers.
If teachers select their Notification Bell and click the original shared District Customized Content, they see a message stating it has been disabled, ensuring it is no longer accessible.
Cloning creates a duplicate version of the selected Customized Content. All of the original information will carry over including Instructions, dates and times, Allow Teachers to preferences, Grade, Distribution Instructions, Randomize Questions, and content Questions. The Clone can remain “as is” and be saved, or be edited as if it were newly created Customized Content. If the Due Date has expired, a new Start Date and Due Date will need to be chosen.
Navigate to the District Customized Content you want to Clone, then find the Clone button in the three dots menu.
The content will open and show the title has automatically been updated to reflect it is a Clone.
Titles can be edited with additional information, along with everything else as if creating new Customized Content. Make the necessary edits (including adding more questions) then select Save in the bottom right corner.
The Clone is now ready to be shared with teachers.